


Belgium
Shopping pages
Using Arduino with Air Manager
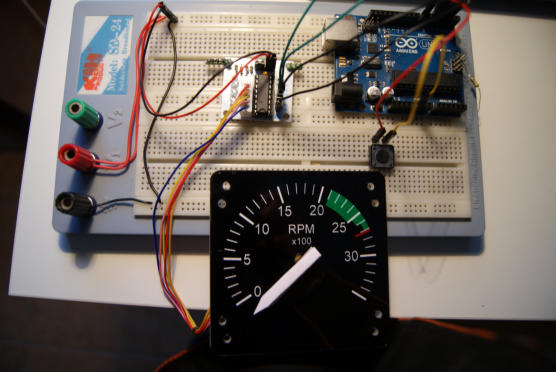
Drive an RPM gauge for B58 or C172 with ULN driver and stepper motor
Below you find a video of a stepper motor example with ULN driver that controls a RPM gauge.
The script was made to work with B58 but of course it can be used with other planes as well.
The stepper is connected via the driver to 4 digital ports on the arduino.
The calibration switch is connected directly to a port on Arduino.
The date comes from XPlane via AirManager, the script does not take more than a few lines.
Need more info, feel free to ask

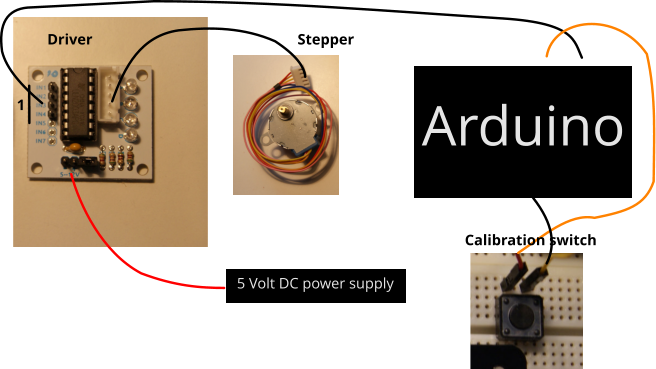
Driver connections
Stepper motor plugged into white connector
IN1 goes to Arduino port 2
IN3 goes to Arduino port 3
IN2 goes to Arduino port 4
IN4 goes to Arduino port 5

1
Calibration switch
Goes to Arduino port 7 and GND
Can be replaced by a photo sensor
to handle calibration automatically
How to use the sensor as a calibration tool
For calibration the best is to use a photo sensor
That is simply a IR led that shines on a photo sensor (transistor)
In Air Manager add the following code to test…
function input_change(state)
print("state = " .. tostring(state))
end
input = hw_input_add("ZeroStop", input_change)
Blocking the light from the LED will trigger a
state changed and you will see that in Air Manager

How to do it practically with an instrument and behind the dial plate
Practical information


Other pages that you might
be interested in
XPLane direct plugin
example with NAV1 radio
How to: Quick start Arduino and
AirManager
7-segment MicroDrivers with
Arduino
RPM Gauge with Arduino
RPM Gauge with Arduino Baron 58
Using Arduino’s
with 7-segment displays
